FAQ
Q&A
-
How can I start BelfiusWeb?
Have your Belfius Card Reader and the BelfiusWeb Card ready.
Go to belfius.be, click on “Public & Social”, then on the green button “BelfiusWeb” or enter the url belfiusweb.belfius.benew in your address bar.
Do you want to work in connected or non-connected mode?
In connected mode, you will need to enter fewer data when logging in and signing transactions and you can import or export files (e.g. payments, CODA).
The non-connected mode gives you access to all features except file import and export.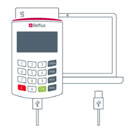
Card Reader connected - The first time you use the programme, BelfiusWeb asks you to install the Trust One Connector programme. This provides the connection between the card reader and the PC. The administrator of the PC(s) of the entity must take care of this by following the procedure described here. At the end of the procedure, close your Internet browser.
- On first connection after installation of the Trust One Connector:
- Enter the card number in the boxes provided for that purpose.
This number appears on your BelfiusWeb Card, alongside the word “CARD”.
The first four digits ‘6703’ are already entered. You only have to enter the following 13 digits. - If, in future, you want to start the programme using a favourite, tick the box “Add to your favourites”.
- After you have swiped your card into the Belfius Card Reader, click on the “Continue” button.
- Enter the PIN code of your BelfiusWeb Card in the Card Reader.
- If you have asked to save the programme in your favourites, a message will appear. Hold the right mouse button down on the link and drag it up into your favourites bar. The Belfius icon will appear.
- After following this procedure, you will be able to use BelfiusWeb.
- Enter the card number in the boxes provided for that purpose.
Card Reader not connected - Enter the card number in the boxes provided.
- You will find this number on your BelfiusWeb Card next to the word “CARD”.
- The first four digits ‘6703' are already filled in. You only have to enter the following 13 digits.
- If, in future, you want to start the programme with a favourite, tick the box “Add to your favourites”.
- A login procedure is displayed, follow the instructions:
- Insert the BelfiusWeb Card in the Belfius Card Reader.
- Press the “Login” button on your Belfius Card Reader.
- Enter the code which is displayed in point 2 on your PC into your Belfius Card Reader.
- Press the “OK” button on your Belfius Card Reader.
- The question “Login ...?” appears on your Belfius Card Reader.
- Press the “OK” button on your Belfius Card Reader.
- Enter the PIN code of your BelfiusWeb Card on the Belfius Card Reader and press the “OK” button.
- A series of numbers appears on the display of the Belfius Card Reader. Enter them in field 4 “Signature Code” on your PC.
- BelfiusWeb opens.
- If you have asked to save the programme in your favourites, a message appears. Hold down the right mouse button on the link and drag it up into your favourites bar. The Belfius icon appears.
- After following this procedure, you will be able to use BelfiusWeb.
-
Which browsers support BelfiusWeb?
Do you want to use all BelfiusWeb features quickly and securely? Then use the latest operating system and the latest version of a compatible web browser (Google Chrome, Edge or Firefox).
- On Windows 11, 10 or 8.1
- BelfiusWeb is compatible with the 3 latest versions of the browsers Mozilla Firefox, Edge Chromium and Google Chrome.
- On Mac OS 13, 12 or 11
- BelfiusWeb is compatible with the 3 latest versions of the browsers Safari, Mozilla Firefox, Edge Chromium and Google Chrome.
- On Windows 11, 10 or 8.1
-
I receive the following error message: "The access code which you have entered… 90AC/1300".
There may be several reasons:
- You are using an card which is invalid for connecting you:
- Please use the BelfiusWeb Card and not a debit card, credit card or prepaid card.
- Are you waiting for a new card? You can no longer use the card that has been deactivated (e.g. after loss, theft or request for a duplicate, order a new card). Use the new card when it arrives.
- You have received a new card but have not yet used it? The card you are using has been deactivated. Use the new card. If you cannot find it, contact us and we will send you a new card.
- The number of the card saved as a favourite and the number of the card you swipe into the Card Reader are not the same. The signature is therefore invalid.
- If your card has been replaced and has a different number than the previous one, you must delete the favourite and create a new one with the new card number.
- Please enter the code you copied from your Card Reader to your PC correctly. If it is not correct, you will receive an error message. You will then have to start the whole signing procedure again.
- You have signed a transaction with a card other than the card you used when you logged in: in a BelfiusWeb session you must always use the same card to sign all your transactions (even from an account of another entity that you manage).
- NB: after 5 erroneous signatures, your BelfiusWeb contract will be automatically blocked for security reasons.
Contact us on 02 222 87 10 (Monday to Friday from 08.30 to 17.00). - You are using an card which is invalid for connecting you:
-
I have lost my BelfiusWeb Card. What should I do?
Contact us on 02 222 87 10 (Monday to Friday from 08.30 to 17.00). We will do what is necessary to block the lost card and send you a new one.
As this is a replacement card, you will also receive a new PIN code.
If you usually start BelfiusWeb with a favourite, you will have to delete it and create a new one because the number of your new card will no longer be the same as the one registered in your favourite.- To delete a favourite, simply right-click on it and select “Delete”.
- To create a new favourite, start BelfiusWeb and follow the instructions below:
- Enter the card number in the boxes provided (it starts with ‘6703’).
- Tick the box “Add to your favourites”.
- After entering the PIN code of your BelfiusWeb Card in the Card Reader, the programme starts.
- A message appears inviting you to create your favourite.
- Hold down the right mouse button on the link in the message and drag it up into your Favourites bar. The Belfius icon appears.
- When you next log in, you will not need to enter your BelfiusWeb Card number again.
-
Why add BelfiusWeb to my favourites?
When you start BelfiusWeb, you must indicate your language and card number.
If you choose to add the address to your favourites, you can then start BelfiusWeb faster via this link. You will no longer need to enter the card number. Thanks to the use of a favourite, each user can create his or her own personal link and start BelfiusWeb. The data on their card is thus entered automatically.
If you have several cards, you must create a favourite for each card. Each favourite contains your name, but a different card number. -
What should I do if the "Connect" button does not react or if I have a blank screen?
These difficulties arise if too many temporary Internet files are backed up on your computer.
Delete them by following the procedure related to your browser: a description follows for each browser. -
How to create a BelfiusWeb bookmark in your browser?
To open BelfiusWeb in one click in your favorites bar and see your BelfiusWeb Card number already filled in, follow the procedure, which differs according to the internet browser you are using.
Google Chrome uses the term "Bookmarks", Safari & Internet Explorer "Favorites” and Mozilla Firefox"Bookmarks". Select your browser to read the instructions.
Google Chrome
• From the BelfiusWeb start page, click on the star on the far right-hand side of the address bar (
 )
)
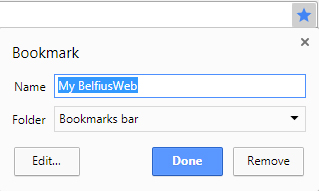
- Name: The default name for the favourite is “My BelfiusWeb”, but you can personalise it – which is useful if there are several of you using the same PC in the same session, each with your own BelfiusWeb Card.
When this is the case, having “BelfiusWeb + your first name” enables each user to see which favourite he or she should use to connect. - Folder: This enables you to indicate where you want this favourite to be located. A folder is displayed by default.
You can change the suggested location by clicking on the little arrow that opens a dropdown menu.
If you have a favourites bar, we recommend you place the folder there. - Click on “Done”: The favourite will then be displayed in the location you have indicated.
Mozilla Firefox- From the BelfiusWeb start page, click on the star in the address bar.
NB: If the star is not in the address bar, click on the icon, right-click on the “Mark this page” entry, then click on “Add to address bar”.
The star turns blue when the page is marked and a window appears so that you can add a name, change the location or give a label to your bookmark.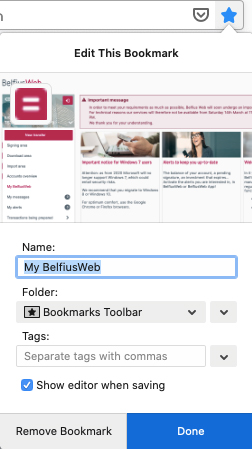
- Name: This is useful if there are several of you using the PC in the same session, each with your own BelfiusWeb Card. In which case, “BelfiusWeb + your first name” makes it easy for each user to know which signet to connect to.
- Folder: You can choose where you want this bookmark to be located by selecting the location from the dropdown menu. If you have a personal bar, we recommend you place it there.
- Labels: you can use labels to help you search through your bookmarks and organise them.
- Click on “End”. Your bookmark will be located in the place you selected.
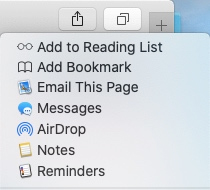
Safari- From the BelfiusWeb start page, click on the Share button (
 ) in the toolbar (at top right of the address bar), then select “Add a signet”.

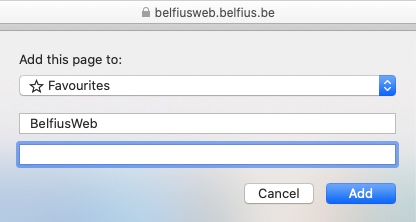
- Choose the location where you want the signet to be and rename it, if you wish.
- Add this page to: You can choose where you want this signet to be located. To place the signet in the toolbar, select “Signets” using the little blue arrows.
- Personalise the signet: This is useful if there are several of you using the same PC in the same session, each with your own BelfiusWeb Card. In which case, “BelfiusWeb + your first name” makes it easy for each user to know which signet to connect to.
- Add a description: You can add more details to help you remember the webpage.
- Click on “Add”: the signet will be recorded in the location you have designated.

Edge- From the BelfiusWeb start page on the star on the right side of the address bar (
 )
)
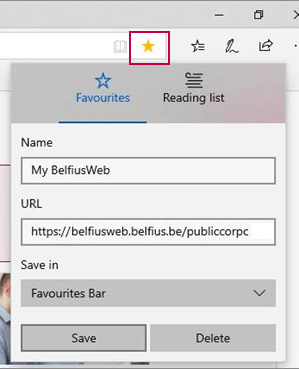
- "Name": the default name of the favourite is "My BelfiusWeb".
You can personalize it if you want. This could be useful when sharing the pc with others under the same session, with everyone using their own BelfiusWeb Card. Thus every user can easily recognize with which favourite he has to log on, by typing "BelfiusWeb + your first name".
- "Name": the default name of the favourite is "My BelfiusWeb".
- "Save in": you can choose where you want to find this favourite. A default folder will be indicated. If you want to change the proposed location, then click on the little arrow in order to open a dropdown menu. Do you have a favourites bar? Than we advise you to put it over there.
- Click on "Save": the favourite will appear at the spot you have indicated.
- Name: The default name for the favourite is “My BelfiusWeb”, but you can personalise it – which is useful if there are several of you using the same PC in the same session, each with your own BelfiusWeb Card.
-
How can I ask for access to BelfiusWeb?
BelfiusWeb allows an “à la carte” configuration of all accesses. Each user can have restricted or extended access, depending on his role in the entity (consulting well-defined data, entering certain types of transactions, preparing transactions for signature and so on).
And you have the possibility to manage this online, on a daily basis, in a flexible and dynamic way!
What do I do?
- As the person(s) in charge of the legal entity, you complete and sign a framework contractto request access to BelfiusWeb and designate the persons who will be authorised to manage the access of users (master users).
- To define the access of users, you can:
- If you want to receive your extracts in PDF format in BelfiusWeb, complete the form to request the PaPyRus service.
- We will then send a BelfiusWeb Card to each user, a PIN code and a Belfius Card Reader.
-
How can I manage accesses and powers of attorney myself in BelfiusWeb?
The “Access Management” manual includes all the detailed information on this subject. Below we list the main points for you.
- Management of BelfiusWeb access
- You have a clear, one-click view of all the functionalities available to your staff members in BelfiusWeb and you can adapt them.
- Management / Access Management” menu:
- Click on the three dots to the right of the user name;
- Click on “Details” or on “Other functionalities”.
- You can create a new user, either based on the settings of an existing user, freely or with the unique function of CardViewer.
- “Management / Access Management" menu:
- New access based on an existing user: the new user will have the same accesses as the reference user, which will be indicated in the following screens.
- New access for a new card: you freely define the different accesses you wish to give to the new user.
- New access for a new BelfiusWeb CardViewer card: the user only has the possibility to view the cards in BelfiusWeb.
- Management of powers of attorney and signature rules on accounts
The “Administration/Power of attorney management” menu makes two summaries available:- one with all of the entity’s accounts
- one with details of all the holders of power of attorney on the entity’s accounts
- view signature rules
- view the details of a power of attorney
- manage the powers of attorney/signature rules
- The “Management of powers of attorney” manual contains full detailed information about this topic.
