FAQ
Q&A
-
How to create a BelfiusWeb bookmark in your browser?
To open BelfiusWeb in one click in your favorites bar and see your BelfiusWeb Card number already filled in, follow the procedure, which differs according to the internet browser you are using.
Google Chrome uses the term "Bookmarks", Safari & Internet Explorer "Favorites” and Mozilla Firefox"Bookmarks". Select your browser to read the instructions.
Google Chrome
• From the BelfiusWeb start page, click on the star on the far right-hand side of the address bar (
 )
)
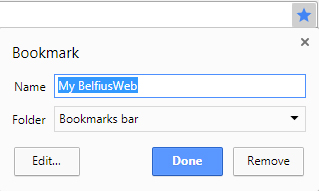
- Name: The default name for the favourite is “My BelfiusWeb”, but you can personalise it – which is useful if there are several of you using the same PC in the same session, each with your own BelfiusWeb Card.
When this is the case, having “BelfiusWeb + your first name” enables each user to see which favourite he or she should use to connect. - Folder: This enables you to indicate where you want this favourite to be located. A folder is displayed by default.
You can change the suggested location by clicking on the little arrow that opens a dropdown menu.
If you have a favourites bar, we recommend you place the folder there. - Click on “Done”: The favourite will then be displayed in the location you have indicated.
Mozilla Firefox- From the BelfiusWeb start page, click on the star in the address bar.
NB: If the star is not in the address bar, click on the icon, right-click on the “Mark this page” entry, then click on “Add to address bar”.
The star turns blue when the page is marked and a window appears so that you can add a name, change the location or give a label to your bookmark.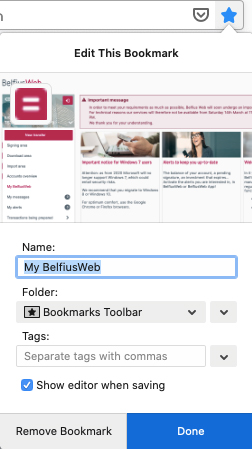
- Name: This is useful if there are several of you using the PC in the same session, each with your own BelfiusWeb Card. In which case, “BelfiusWeb + your first name” makes it easy for each user to know which signet to connect to.
- Folder: You can choose where you want this bookmark to be located by selecting the location from the dropdown menu. If you have a personal bar, we recommend you place it there.
- Labels: you can use labels to help you search through your bookmarks and organise them.
- Click on “End”. Your bookmark will be located in the place you selected.
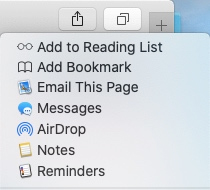
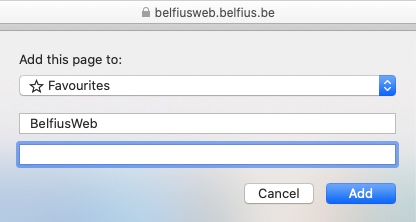
Safari- From the BelfiusWeb start page, click on the Share button (
 ) in the toolbar (at top right of the address bar), then select “Add a signet”.

- Choose the location where you want the signet to be and rename it, if you wish.
- Add this page to: You can choose where you want this signet to be located. To place the signet in the toolbar, select “Signets” using the little blue arrows.
- Personalise the signet: This is useful if there are several of you using the same PC in the same session, each with your own BelfiusWeb Card. In which case, “BelfiusWeb + your first name” makes it easy for each user to know which signet to connect to.
- Add a description: You can add more details to help you remember the webpage.
- Click on “Add”: the signet will be recorded in the location you have designated.

Edge- From the BelfiusWeb start page on the star on the right side of the address bar (
 )
)
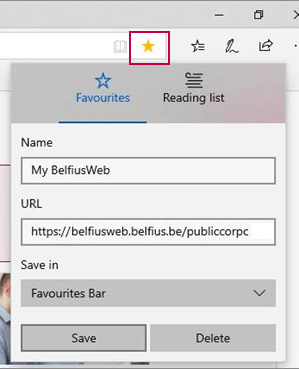
- "Name": the default name of the favourite is "My BelfiusWeb".
You can personalize it if you want. This could be useful when sharing the pc with others under the same session, with everyone using their own BelfiusWeb Card. Thus every user can easily recognize with which favourite he has to log on, by typing "BelfiusWeb + your first name".
- "Name": the default name of the favourite is "My BelfiusWeb".
- "Save in": you can choose where you want to find this favourite. A default folder will be indicated. If you want to change the proposed location, then click on the little arrow in order to open a dropdown menu. Do you have a favourites bar? Than we advise you to put it over there.
- Click on "Save": the favourite will appear at the spot you have indicated.
- Name: The default name for the favourite is “My BelfiusWeb”, but you can personalise it – which is useful if there are several of you using the same PC in the same session, each with your own BelfiusWeb Card.
-
How can I display the functions I use most first so that I can find them easily?
If you use certain modules frequently, it can be handy for them to be displayed first in the menu. For example: “Summary of accounts”, “To be signed”, “To download”.
Proceed as follows:
- Click on the cogwheel in the menu, next to “My shortcuts”.
- You will see a page with two columns: selectionable shortcuts and shortcuts selected.
- Click on the “+” next to the selectionable shortcut that you wish to add to your shortcuts. It will then appear automatically in the list of shortcuts selected.
- You can order your shortcuts using the up and down arrows.
- Click on “Confirm”.
- In the menu, you will see the functionalities selected at the top of the menu.
-
How can I display more information than the amount defined as standard?
We have opted to display the information used most in all BelfiusWeb screens. However, additional information is often available and you can freely choose to display it on the screen if you want to./p>
To do so, simply click on the little eye shown at the extreme right of the pink strip located above the information and tick what you want to be able to view.

-
How do I make selections within details?
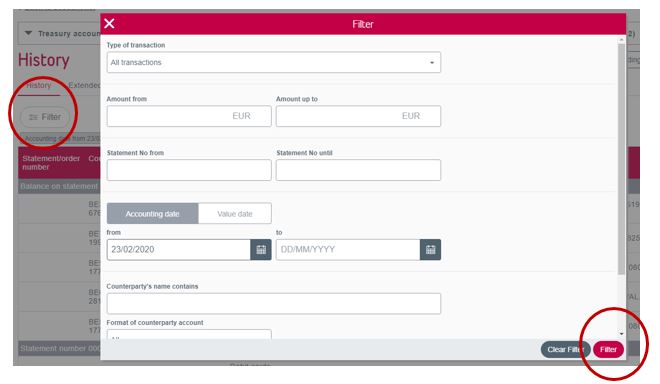
In screens such as an account history, you can make selections based on different criteria.
To do so, click on the “Filter” button located above the list of details and fill in the filters to see the result of your selection and click on “Filter”. Example: all expenditure of under 10 euros made during a specific period.
Tip: if you are entering negative amounts in the selection criteria, you must put the minus sign followed by the amount (e.g. -5). The highest amount should feature in “Amount from” (-5) and the lowest in “Amount to” (-10).
-
How do I set the location to which I want to download Coda, Papyrus and Loan files?
If you ask to receive Coda, Papyrus or loan files, before you can receive them, you need to set BelfiusWeb to indicate the folder you want them to be saved in.
- In the menu, click on “Administration” and then on “My directories”.
- Click on the button "Add Directory".
- Click on “Browse” and select the location where these files are to be saved. Click on “Select Folder”.
- A confirmation message tells you that the folder has been created.
-
How can I manage accesses and powers of attorney myself in BelfiusWeb?
The “Access Management” manual includes all the detailed information on this subject. Below we list the main points for you.
- Management of BelfiusWeb access
- You have a clear, one-click view of all the functionalities available to your staff members in BelfiusWeb and you can adapt them.
- Management / Access Management” menu:
- Click on the three dots to the right of the user name;
- Click on “Details” or on “Other functionalities”.
- You can create a new user, either based on the settings of an existing user, freely or with the unique function of CardViewer.
- “Management / Access Management" menu:
- New access based on an existing user: the new user will have the same accesses as the reference user, which will be indicated in the following screens.
- New access for a new card: you freely define the different accesses you wish to give to the new user.
- New access for a new BelfiusWeb CardViewer card: the user only has the possibility to view the cards in BelfiusWeb.
- Management of powers of attorney and signature rules on accounts
The “Administration/Power of attorney management” menu makes two summaries available:- one with all of the entity’s accounts
- one with details of all the holders of power of attorney on the entity’s accounts
- view signature rules
- view the details of a power of attorney
- manage the powers of attorney/signature rules
- The “Management of powers of attorney” manual contains full detailed information about this topic.
-
I do have access to “Mandate Management”, yet I get the message that I do not have access. Why is that?
Consulting mandates is, of course, possible in the “Mandate Management” screen.
Mandate management is currently not operational unless your entity has a Servicing Officer.
Entities serviced through a branch should see their branch for all queries relating to mandates.
-
How can I remove a proxy from all of the entity’s accounts with a single digital request?
If you, as a user, have access to the ‘Proxy Management’ package, then you are also able to remove proxies.
For example, if a person no longer works in your entity and you wish to remove a proxy from all of the entity’s accounts, then you can do so by way of a single request:- Administration/Proxy Management menu.
- Click on the ‘Proxies’ tab.
- Click on the 3 dots to the right of the name of the person whose proxy you wish to remove.
- Select ‘Remove proxy’.
- In the next screen, you can upload any supporting documents (minutes, articles of association, etc.) and provide a description of the required changes.
- Click on ‘Send’.
- Your request will be in ‘Messages’/‘Sent’.
- The department in question will contact you and the necessary documents will be drawn up.
User's manual |

