FAQ

Q&A

  • How do I add transfers to an existing envelope?

    • ‘Transactions in preparation’/‘Envelopes’/‘Summary’ takes you to the list of envelopes. Here you will find 3 tabs: active, recurrent and archived envelopes.
    • To the right of the active or recurrent envelope, click on the 3 dots and select ‘Transactions’ to modify an envelope.
    • Then click on ‘New transfer’ in the top right-hand corner.
    • Enter the transfer and finish by clicking ‘Save’ or on ‘Save (draft)’ if the details are not yet complete.
    • To return to the list of transactions in the envelope, click on the link ‘To envelope...’ at top left on your screen.
  • Where will I find counterparties?

    Go to ‘Products’ > ‘Accounts’ > ‘Counterparties’ or to ‘Social accounts’ – ‘Counterparties’.
  • How do I select a payee or counterparty in the transfer form?

    This can be done in 2 ways and depends on the number of payees saved:
    1. In ‘Payee name’ enter the first few letters of the name. You will then see a list from which you can select the payee.
    2. Click on the magnifying glass in the ‘Payee account’ box. A menu will then open from which you can select the payee.
  • How do I enter a new transfer?

    You can do this in 3 several ways:

    • Via the shortcut ‘New transfer’ above the menus on the left-hand side.
    • By clicking on the 3 dots with the accounts at the back and selecting ‘New transfer’.
    • From the menu ‘Transactions in preparation’  ‘Simple transactions’ or ‘Extended transactions (to envelopes)’. At top right click on ‘New transfer’.

    In ‘Transfer type’, select the type of transfer you want to enter. You can choose from:

    • European transfer
    • International transfer
    • Cheque
    • Transfer between subfunds

    Then select the way in which you wish to make the transfer. Select ‘Normal entry’ when you wish to create 1 or more separate or individual transfers. Select ‘Extended entry (to envelope)’ when you want to create a general payment file of transfers.

    When entering a cross-border or forex transfer, you will be kept informed, throughout the processing of your transaction, of the relevant charges and rates.

  • I cannot see the transfer screen in full. What should I do?

    • Set your screen to maximum size.

      NEWFAQ13a
    • Control to make sure the zoom on your browser is no higher than 100%.

      NEWFAQ13b
  • Where will I find envelopes and how do I send an envelope?

    • Select ‘Envelopes to be processed’.
    • This is where you will find the ‘Envelope created’.
    • Click on the 3 dots behind and select ‘Send as file’.
    • You can opt to send the file signed or unsigned.
    • With ‘Files to be processed’ you can check the status of the file and, if necessary, place a 2nd signature.
  • Where will I find the details of a payment file?

    • Via ‘Transactions in preparation’/‘Files’
      • Click on the 3 dots to the right of the file for which you want the details.
      • Select ‘Details’
      • You will be shown the details of the entire file.
    • For more details, click on the 3 dots to the right of any file and select the ‘Messages’ option (group payments with the same instructing account):
      • Various messages for the file will be displayed
      • Click on ‘Details’ via the 3 dots to the right of the message
      • You will then see the details of the message
  • How do I sign a transfer that has been entered via normal entry?

    • Go to ‘Transactions in preparation’.
    • Select ‘Simple transactions’ > ‘Transfers’.
    • You will then see the list of transfers./li>
    • Next to ‘Filter’ select ‘Transactions that I can sign’.
    • You can now tick and sign the transactions.
  • How do I sign a transfer that has been entered via extended entry?

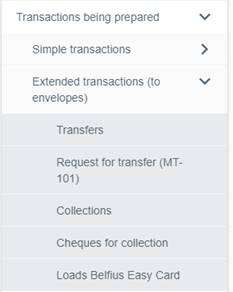
    • o Go to ‘Transactions in preparation’ > ‘Extended transactions (to envelopes)’ > ‘Transfers’.

      NEWFAQ33a

    • o From the list select the transfers you want to sign.
    • o You then have 2 possibilities: either you send and sign the payments straight away, or you first make an envelope.

      NEWFAQ33b


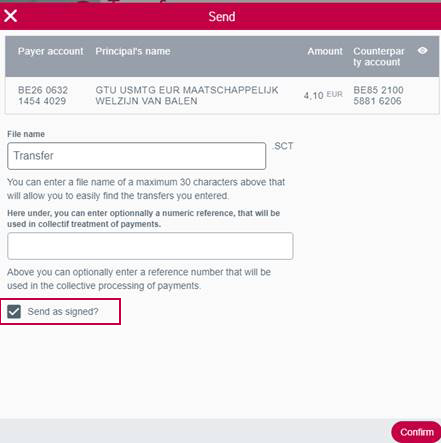
      Send 
      You do not wish to add the payments to an envelope because you do not want to use the payment file later.
    • o Click on ‘Send’ if you want to send the payments straight away.
    • o If you have the authority yourself, then you can sign the payments immediately by ticking ‘Send envelope signed?’.

      NEWFAQ33c
    • o You then ‘Confirm’ the payments. The payments can only be signed if you have the authority.
    • o Sign the payments.
    • o A popup appears with a link to your files. This link takes you to ‘Transactions in preparation’ > ‘Files’. There you will find the status of your file at Belfius, together with files awaiting signature.

      NEWFAQ33d
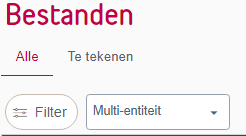
    • o ‘All’ tab: this is where you will find all of the payments accepted by Belfius that are still awaiting signature or where there is an error. Make selections using the ‘Filter’ or use the dropdown menu next to ‘Filter’ for the entity whose files you wish to view.
    • o ‘To be signed’ tab: all of the payments you can sign are here. Make selections using the ‘Filter’ functions or with the dropdown menu next to ‘Filter’.

      Add to envelope 
      You want to add payments to an envelope (new or existing) before you sign it so that you can use this payment file again in the future.
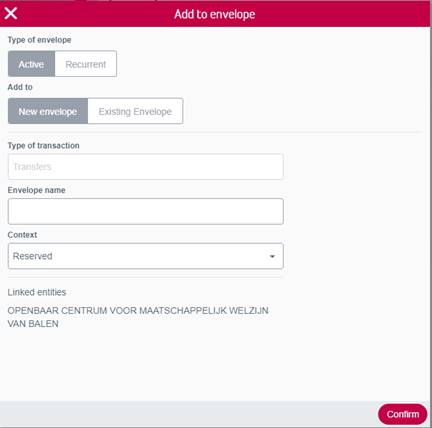
    • o Click on ‘Add to envelopes’

      NEWFAQ33f
    • o Select ‘Active’ or ‘Recurring’ envelope
    • o Select ‘New envelope’ or ‘Existing envelope’
    • o Then give the envelope a name and confirm.
    • o You will now find the envelope in ‘Transactions in preparation’ > ‘Summary’ > ‘Envelopes’.
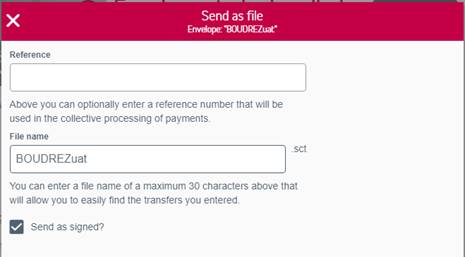
    • o To the right of the envelope created, click on the 3 dots to select ‘Send as file’. /li>
    • o You can now send the file signed or unsigned.

      NEWFAQ33g

    • o In ‘Transactions in preparation’ > ‘Files’ you will find the status of the file and its status at Belfius. You can also sign it, if required.
  • How do I sign a transfer that has been entered via an imported payment file?

    • Go to ‘Transactions in preparation’.
    • Select ‘Files’.

      NEWFAQ34a NEWFAQ34b
    • ‘All’ tab: this is where you will find all of the payments accepted by Belfius that are still awaiting signature or where there is an error.
      Make selections using the ‘Filter’ or use the dropdown menu next to ‘Filter’ for the entity whose files you wish to view.
    • To be signed’ tab: all of the payments you can sign are here.
      Make selections using the ‘Filter’ functions or with the dropdown menu next to ‘Filter’. .